

Tutorial: Evaluating RAUC on QEMU - A Quick Setup With Yocto
RAUC is an update framework for safely deploying verified updates on your embedded Linux devices. It ensures atomicity of the update process to protect from sudden power outages, hardware failures, etc. So, why would one like to run RAUC on an emulated platform?
The answer to this is not only "because you can!", but it also allows you to
- get an idea of the basic concepts and behavior of RAUC
- try out its command line interface
- use parts of this as a reference integration for your real HW project
- test your integration of RAUC into your own application (also in CI)
- test interaction of RAUC with your (deployment) ecosystem (also in CI)
- simply play around
Luckily, there is no need to perform a full integration of RAUC here on our own. Instead, we take advantage of the meta-rauc-community-Layer.
During our annual Pengutronix-internal hacking week 'TechWeek', I finalized my support for integrating RAUC for the x86-64 QEMU platform in Yocto/poky and contributed this to meta-rauc-community. Some additional fixes I recently contributed as part of the preparation of this tutorial.
So let's get started with using this!
Setup Overview
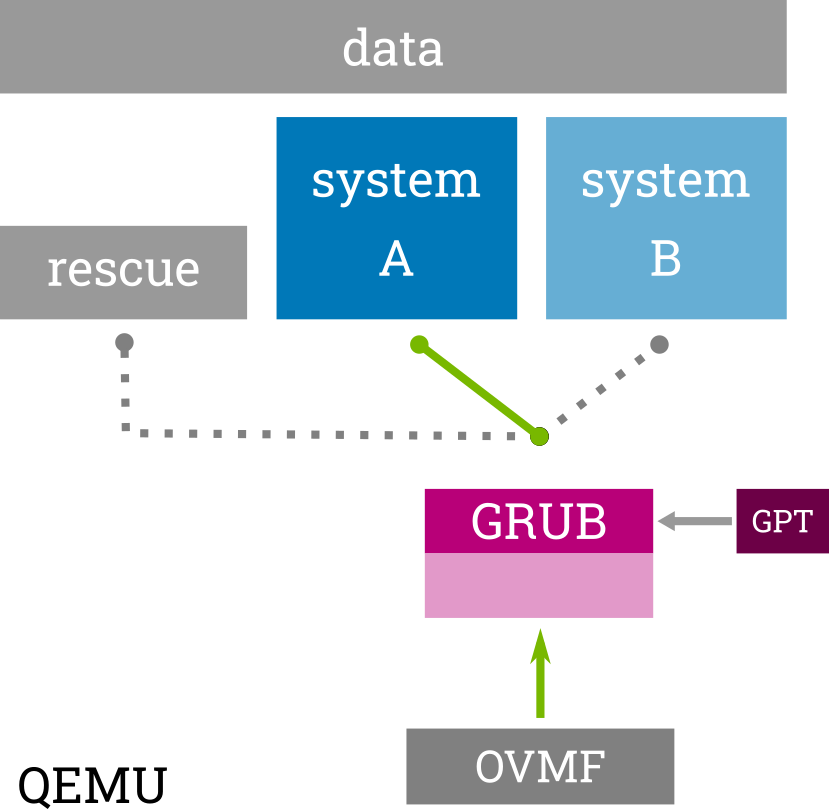
Overview over QEMU A+B+recovery setup
The integration shows one possible example of a redundancy boot set-up with RAUC on x86. The layout is a symmetric A+B system with an additional rescue system. The GRUB bootloader (started by the UEFI firmware) is configured to select the proper boot target.
To demonstrate the bootloader update capabilities of RAUC, it is also configured to allow updating the EFI partition atomically (by switching the GPT entry).
Requirements and Preparation
For the tutorial, it is not strictly necessary (but recommended) to have basic knowledge of embedded (Linux) systems and the Yocto project.
As no hardware is involved, all we need to follow this tutorial is a shell on a Linux system. It could also be virtual machine but should be powerful enough to build basic Yocto-based systems in finite time.
Also make sure to have the build requirements for the Yocto project installed.
Creating Our Project
First, we set up our build directory using poky and add some layer repositories that we will need in the following.
Note
This example uses the honister-3.4.1 release of poky, but you can also use master or any future release.
$ mkdir rauc-qemu-demo
$ cd rauc-qemu-demo
$ git clone -b honister-3.4.1 https://git.yoctoproject.org/poky
$ git clone -b honister https://github.com/rauc/meta-rauc.git
$ git clone -b master https://github.com/rauc/meta-rauc-community.git
The layer we actually need to activate are
- meta-rauc for providing basic RAUC recipes and classes
- meta-rauc-qemux86 for the example QEMU integration
$ source poky/oe-init-build-env build
$ bitbake-layers add-layer ../meta-rauc-community/meta-rauc-qemux86
$ bitbake-layers add-layer ../meta-rauc
Configuring Our Project
(tl;dr: Scroll down to the end of this section and copy the lines from the box to your conf/local.conf.)
Now that we have sourced the environment and added the required layers, you could already potentially start building an image. But for an actually working set-up, there are some additional items to configure.
So far, adding meta-rauc only provides additional recipes, but does not change your build, yet. For some useful overrides of standard recipes (like busybox or linux-yocto) to take effect, we have to enable the DISTRO_FEATURE named rauc.
Thus you can open your conf/local.conf and add this line:
DISTRO_FEATURES += "rauc"
Tip
If your project already uses a custom distribution, that would be the proper place to set DISTRO_FEATURES.
To actually have RAUC installed into the core-image-minimal target rootfs image that we will use, add this line to your conf/local.conf:
CORE_IMAGE_EXTRA_INSTALL += "rauc"
As we intend to build and boot not only a file system image but a full disk image, we need to add some more configuration for gaining full UEFI boot capabilities:
MACHINE_FEATURES:append = " pcbios efi"
EXTRA_IMAGEDEPENDS += "ovmf"
And finally select the proper GRUB boot configuration.
PREFERRED_RPROVIDER_virtual-grub-bootconf = "rauc-qemu-grubconf"
Tip
It is recommended (but not strictly required) for RAUC to use systemd as your init system. If you intend to do so, you can set:
INIT_MANAGER = "systemd"
In your conf/local.conf (or custom distro config).
In a later step in this tutorial we also intend actually perform a RAUC update in our evaluation system. This requires being able to copy a bundle to the target using scp. Thus, as a final step, we also make sure that we have an SSH server installed on the target by adding to conf/local.conf:
EXTRA_IMAGE_FEATURES += "ssh-server-openssh"
Note
As a copy&paste template, the additional content of your conf/local.conf now should look as follows:
DISTRO_FEATURES += "rauc"
CORE_IMAGE_EXTRA_INSTALL += "rauc"
MACHINE_FEATURES:append = " pcbios efi"
EXTRA_IMAGEDEPENDS += "ovmf"
PREFERRED_RPROVIDER_virtual-grub-bootconf = "rauc-qemu-grubconf"
INIT_MANAGER = "systemd"
EXTRA_IMAGE_FEATURES += "ssh-server-openssh"
Setting up Bundle Signing Keys
Updates with RAUC are always cryptographically signed and verified using public key certificates according to the X.509 standard (as known from TLS, S/MIME and CMS).
Important
Normally, this requires setting up full public key infrastructure (PKI) as a trust anchor.
The pki-tutorial from Stefan H. Holek may serve as a good starting point.
For this example scenario, we narrow this down to a simplified setup:
- A self-signed certificate key pair consisting of the private key and a public key certificate serves as the root CA.
- A single subordinate 'development' key pair (signed by the CA) to sign the example bundle
The meta-rauc-community layer already comes with a convenience script to create the required key pairs and integrate them into the build by automatically setting the required variables in the local configuration file conf/site.conf.
To execute it, change into the meta-rauc-community layer, run ./create-example-keys.sh and switch back to the build directory:
$ cd ../meta-rauc-community/meta-rauc-qemux86/
$ ./create-example-keys.sh
Development CA
Generating a RSA private key
..+++++
..+++++
writing new private key to 'private/ca.key.pem'
-----
Using configuration from /ptx/work/WORK_SANAH/ejo/bsps/rauc-qemu-demo/build/example-ca/openssl.cnf
Check that the request matches the signature
Signature ok
Certificate Details:
        Serial Number: 1 (0x1)
        Validity
            Not Before: Jan  1 00:00:00 1970 GMT
            Not After : Dec 31 23:59:59 9999 GMT
        Subject:
            organizationName          = Test Org
            commonName                = Test Org rauc CA Development
        X509v3 extensions:
            X509v3 Subject Key Identifier:
                23:25:46:79:1B:10:08:AA:B6:83:22:7F:D4:76:BC:FD:ED:78:DD:CF
            X509v3 Authority Key Identifier:
                keyid:23:25:46:79:1B:10:08:AA:B6:83:22:7F:D4:76:BC:FD:ED:78:DD:CF
                DirName:/O=Test Org/CN=Test Org rauc CA Development
                serial:01

            X509v3 Basic Constraints:
                CA:TRUE
Certificate is to be certified until Dec 31 23:59:59 9999 GMT (2913877 days)

[...]

Writing RAUC key configuration to site.conf ...
Key configuration successfully written to /ptx/work/WORK_SANAH/ejo/bsps/rauc-qemu-demo/build/conf/site.conf

$ cd -
The result you can see when dumping conf/site.conf:
$ cat conf/site.conf
RAUC_KEYRING_FILE="[..]/build/example-ca/ca.cert.pem"
RAUC_KEY_FILE="[..]/build/example-ca/private/development-1.key.pem"
RAUC_CERT_FILE="[..]/build/example-ca/development-1.cert.pem"
Now we have set up all that is required to build the project.
Building The QEMU System Image
Note
Make sure you have selected the proper distro poky and machine qemux86-64 in your conf/local.conf (both should be the default).
We can start building poky's default minimal system image core-image-minimal by invoking:
$ bitbake core-image-minimal
Tip
This will take some time, depending on your build machine. Grab a coffee. Or two.
At the end of the build process, you should have some artifacts in your machine's deploy folder (tmp/deploy/images/qemux86-64):
$ ls -1 tmp/deploy/images/qemux86-64
bzImage@
bzImage--5.14.17+git0+b3ac9c40a2_35888b3a9a-r0-qemux86-64-20220125010439.bin
bzImage-qemux86-64.bin@
[..]
core-image-minimal-qemux86-64.ext4@
core-image-minimal-qemux86-64.manifest@
core-image-minimal-qemux86-64.qemuboot.conf@
core-image-minimal-qemux86-64.tar.bz2@
core-image-minimal-qemux86-64.testdata.json@
core-image-minimal-qemux86-64.wic@
[..]
The symlink core-image-minimal-qemux86-64.wic is the most important here as this points to the full disk image we will use to boot from in the next section.
Booting the QEMU System
Having sourced the bitbake environment script, you automatically also have the poky QEMU wrapper script runqemu in your PATH:
$ runqemu -h
This script eases setting up QEMU by reading a Yocto-generated QEMU configuration from your deploy folder and provides some convenience configuration options.
We call it with the arguments nographic for non-graphical mode, slirp to have network as non-root, ovmf to boot with the OVMF EFI Firmware, and wic to use the .wic disk image generated for our rootfs:
$ runqemu nographic slirp ovmf wic core-image-minimal
This will start the system and let EFI boot into the GRUB bootloader menu:

The boot menu contains a boot entry for each slot (A, B, rescue) used in our redundancy setup (as described above). The values in brackets represent variables persisted in the grubenv and used by RAUC to select the proper partition to boot.
If not already selected, choose Slot A here and press <Enter>, otherwise just wait for the auto-boot countdown to complete.
The QEMU should then boot your system up to the login prompt:

Log in as user root with empty password.
Now you are in a system that is running RAUC and is capable of being updated like a real system.
RAUC provides a command line interface for debugging and development purposes. This also allows us to introspect the current state of the redundancy setup. We can request an overview by calling the rauc status command:

For RAUC, the A+B redundancy slots are referred to as rootfs.0 and rootfs.1. The rescue system is called rescue.0 and the EFI partition holding the bootloader is referred to as efi.0
As expected, we see the rootfs.0 slot being the one that is currently activated and booted.
Tip
The slot names and values are not magic, they are defined in the plain text ini-style system configuration file /etc/rauc/system.conf.
Building The Update Bundle
The meta-rauc-qemux86 layer also comes with a ready-to-build recipe for a RAUC update bundle. In addition to a rootfs image, it also provides a bootloader/EFI image to demonstrate RAUC's capability of performing atomic bootloader updates on GPT.
Build the demo bundle using this command:
$ bitbake qemu-demo-bundle
This will leave an update bundle in the deploy folder under tmp/deploy/images/qemux86-64/qemu-demo-bundle-qemux86-64.raucb.
To check the content of this bundle on your host, you can manually invoke the rauc host tool by using the oe-run-native helper script:
$ bitbake rauc-native -c addto_recipe_sysroot
$ oe-run-native rauc-native rauc info --keyring=/path/to/ca.cert.pem tmp/deploy/images/qemux86-64/qemu-demo-bundle-qemux86-64.raucb
Running bitbake -e rauc-native
Compatible:  'qemu86-64 demo platform'
Version:     '1.0'
Description: 'qemu-demo-bundle version 1.0-r0'
Build:       '20220128160205'
Hooks:       ''
Bundle Format:       verity
  Verity Salt:       '9774a9fce2c06c5513c3339bb46d591c5dc393af1bf8c8e8ee292a0c0c707dfb'
  Verity Hash:       'e7383c28833ae92389546d5c0779158220cd72342ca94a4e2fc5ba45fe2b526c'
  Verity Size:       352256

2 Images:
  [efi]
     Filename:  efi-boot.vfat
     Checksum:  6ca86bc62014ff21f2cfe2773d08218a57fb24d07651a3d46c1ae791b10845ad
     Size:      33572864
     Hooks:
  [rootfs]
     Filename:  core-image-minimal-qemux86-64.tar.bz2
     Checksum:  2bdfe2c3eaec4add3ba6c1baaf82dfd6fb9c97c105dab98fd70ae8248016feff
     Size:      44355818
     Hooks:

Certificate Chain:
 0 Subject: O = Test Org, CN = Test Org Development-1
   Issuer: O = Test Org, CN = Test Org rauc CA Development
   SPKI sha256: 08:D2:08:25:06:2D:74:25:63:DF:64:A2:50:EF:96:1F:E1:C5:54:32:2F:36:0C:5E:6A:FF:2C:16:E1:8D:D9:DB
   Not Before: Jan  1 00:00:00 1970 GMT
   Not After:  Dec 31 23:59:59 9999 GMT
 1 Subject: O = Test Org, CN = Test Org rauc CA Development
   Issuer: O = Test Org, CN = Test Org rauc CA Development
   SPKI sha256: E1:EC:C5:31:27:43:50:19:0B:6D:66:21:A4:90:CA:AD:F8:94:D6:D2:FD:ED:41:BA:66:6A:F6:AA:33:5B:0C:A3
   Not Before: Jan  1 00:00:00 1970 GMT
   Not After:  Dec 31 23:59:59 9999 GMT
Tip
You can also simplify specify the verification keyring by using:
eval `grep RAUC_KEYRING_FILE conf/site.conf`
oe-run-native rauc-native rauc info --keyring=$RAUC_KEYRING_FILE tmp/deploy/images/qemux86-64/qemu-demo-bundle-qemux86-64.raucb
As expected, the bundle contains two images: one for the slot of class efi and one for a slot of class rootfs. You can also see that the compatible matches the one defined for the target system. So as this looks correct, let's install the update.
Installing The Update Bundle
To actually install the RAUC bundle in this example setup, we need to copy it into the QEMU system's file system.
Note
RAUC also supports updates from remote URLs for casync and will receive built-in streaming installation capabilities soon.
As we have set up slirp, we can do this over network via scp:
$ scp -P 2222 tmp/deploy/images/qemux86-64/qemu-demo-bundle-qemux86-64.raucb root@localhost:/data/
Note
The port must match the one printed as hostfwd for port 22 during qemu startup in the line:
runqemu - INFO - Port forward: hostfwd=tcp::2222-:22 hostfwd=tcp::2323-:23
Also note that you might run into scp failing if invoked too early and the keys on the target side are not created, yet. Just retry after a few seconds in that case.
After copying the update bundle to your QEMU target, you can run rauc install /data/qemu-demo-bundle-qemux86-64.raucb from within QEMU to start the actual installation:

After successful installation, RAUC activates the formerly inactive slot. It also stores information about the update in the configured central status file /data/rauc.status.
You can inspect this all by calling rauc status --detailed:
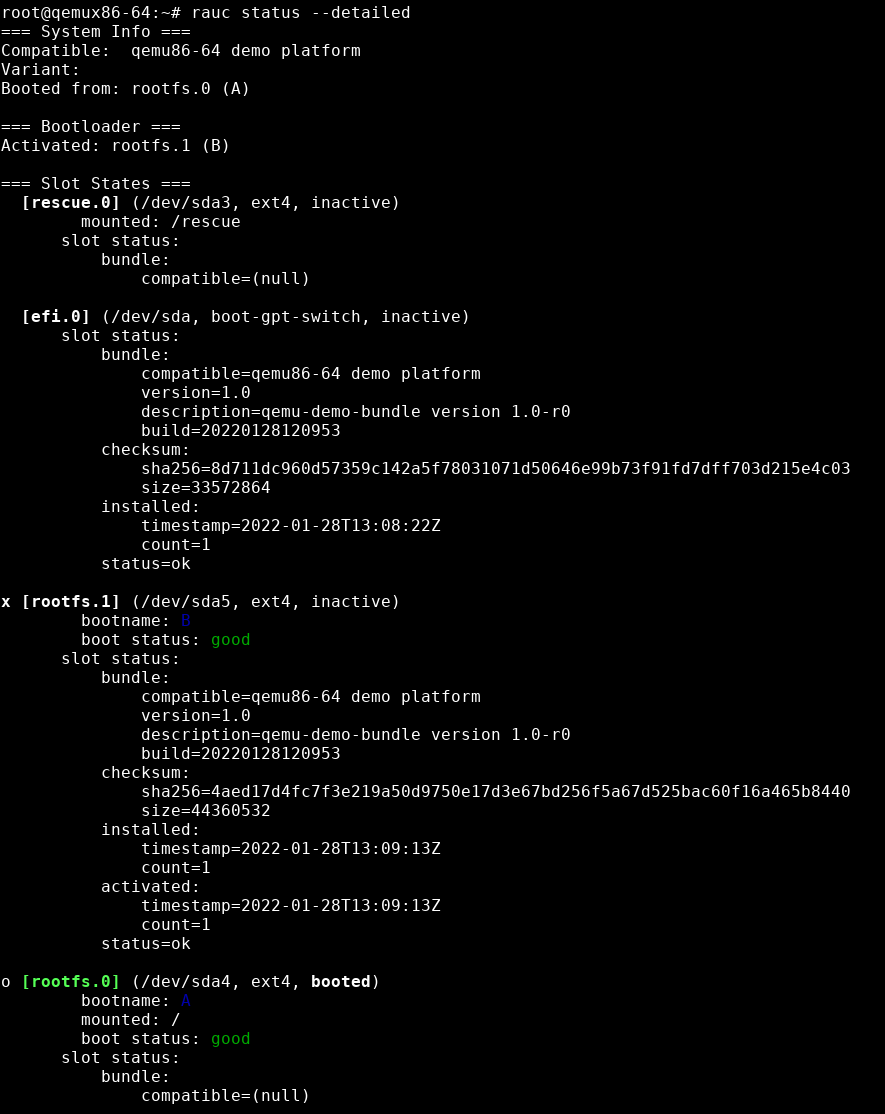
Note the different slots referred to as "Booted from" and "Activated" (and the x marking rootfs.1 now).
Reboot into Updated System
You can now reboot into the just-installed system using normal reboot (or systemctl reboot when using systemd).
As upon first boot, you will see the GRUB boot menu again, but now with the Slot B entry being pre-selected:
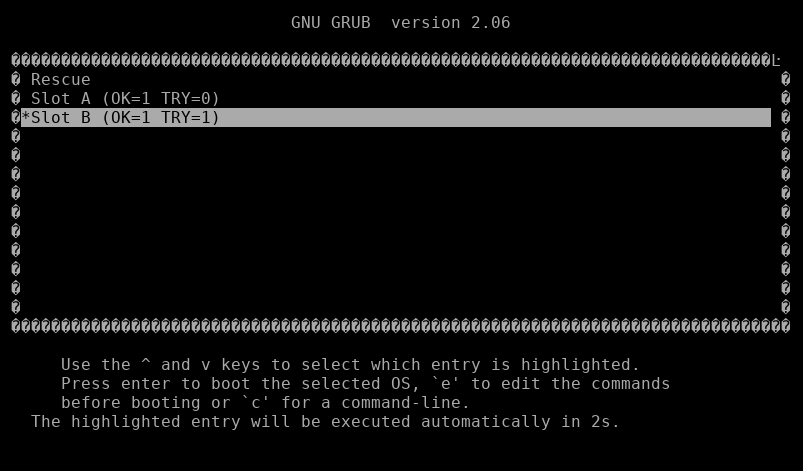
Just wait for GRUB to continue and see your freshly installed system booting up.
As the very last step in our tutorial we'll verify that we actually ended up in the correct situation.
For this, we call rauc status one last time:
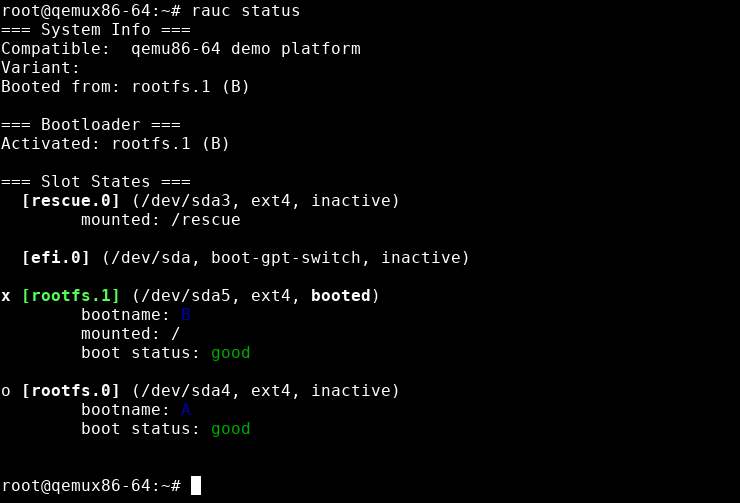
As you can see, the booted slot (marked green and having the booted flag set) is now rootfs.1. You can also see that it is reported as the slot being mounted to / and thus is actually your currently active root file system.
The tutorial ends here, you can now play around on your own, try another platform provided by meta-rauc-community, or start integrating RAUC for your own Yocto-/poky-based project and use cases.
Weiterführende Links

RAUC und labgrid Sponsoring-Pakete ab jetzt im Shop!
RAUC und labgrid sind Open Source Software-Projekte, die beide bei Pengutronix gestartet wurden und in ihren jeweiligen Nischen mittlerweile recht erfolgreich geworden sind. Ab heute ist es möglich Sponsoring-Pakete im Linux Automation GmbH Shop zu erwerben, die die Entwicklung dieser Projekte unterstützen.RAUC v1.15 Released
It’s been over half a year since the RAUC v1.14 release, and in that time a number of minor and major improvements have piled up. The most notable change in v1.15 is the newly added support for explicit image types, making handling of image filename extensions way more flexible. Other highlights include improved support for A/B/C updates and several smaller quality improvements. This release also includes the final preparations for upcoming features such as multiple signer support and built-in polling.
RAUC - 10 Years of Updating 🎂
10 years ago, almost a decade before the Cyber-Resilliance-Act (CRA) enforced updates as a strict requirement for most embedded systems, Pengutronix started RAUC as a versatile platform for embedded Linux Over-The-Air (and Not-So-Over-The-Air) updates.

Signed FIT Image Support for meta-oe (fitimage.bbclass)
FIT images provide a versatile way to bundle components used to boot embedded Linux systems, like the kernel, device tree, ramdisk, firmware, etc. They also support cryptographic signatures, making them ideal for verified boot setups. This blog post introduces the new fitimage.bbclass in meta-oe as an alternative to oe-core's kernel-fitimage.bbclass, with a clear focus on enhancing both versatility and signing support.
Bringing Barebox into OE-Core (Yocto)
This blog post chronicles the multi-year journey to get Barebox accepted into OE-Core—from the early attempts to the eventual success in October 2024. Along the way, we’ll explore the technical hurdles we faced, the community discussions that shaped the process, and the improvements we added to both OE and Barebox.Tutorial: Start With RAUC Bundle Encryption Using meta-rauc
In its current master branch, RAUC now supports encrypted Bundles. This tutorial will introduce you to the basics of using encryption in RAUC and show how to use it in a simplified Yocto setup with the meta-rauc Layer.
CLT-2022: Voll verteilt!
Unter dem Motto "Voll verteilt" finden die Chemnitzer Linux Tage auch 2022 im virtuellen Raum statt. Wie auch im letzten Jahr, könnt ihr uns in der bunten Pixelwelt des Workadventures treffen und auf einen Schnack über Linux, Open Source, oder neue Entwicklungen vorbei kommen.

labgrid Tutorials
This week, we started our series of YouTube labgrid tutorials. In the next few weeks we will publish more video tutorials showing you labgrid's features and giving you handy tips and tricks.